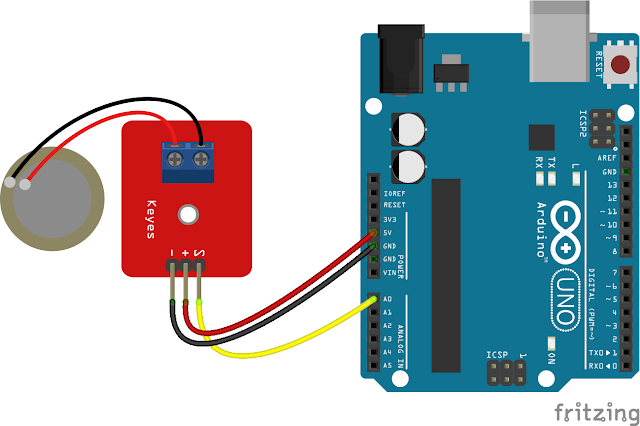
how to work piezoelectric sensor with an Arduino And its Application
Piezoelectric
sensors are devices that can detect pressure, acceleration, strain, and force.
These sensors have the ability to convert mechanical energy into electrical
energy, making them very useful in a variety of applications.
One such
application is using a piezoelectric sensor with an Arduino, a popular
open-source microcontroller platform. By connecting a piezoelectric sensor to
an Arduino, you can create a system that can detect and measure various types
of mechanical energy.
To connect a piezoelectric sensor to an Arduino, you will need to follow a few steps:
First, gather the necessary materials. You will need an Arduino board, a piezoelectric sensor, some jumper wires, and a breadboard.
Next, connect the piezoelectric sensor to the breadboard. The piezoelectric sensor has two leads, one positive and one negative. Connect the positive lead to one side of the breadboard, and the negative lead to the other side.
Then, connect the breadboard to the Arduino using jumper wires. Connect the positive lead of the piezoelectric sensor to a digital input pin on the Arduino, and the negative lead to a GND pin.
Once the connections are made, you can write a program for the Arduino to read the output of the piezoelectric sensor. The Arduino has an analog-to-digital converter (ADC) that can measure the voltage coming from the piezoelectric sensor and convert it into a digital value.
To do this, you can use the analogRead() function in your Arduino program. This function takes an analog input pin as an argument and returns a value between 0 and 1023, where 0 represents 0 volts and 1023 represents 5 volts.
For example, to read the output of the
piezoelectric sensor on analog input pin A0, you could use the following code:
int sensorValue = analogRead(A0);
With this setup, you can use the sensorValue variable to measure the output of the piezoelectric sensor and perform various actions based on the value. For example, you could turn on an LED if the sensor value exceeds a certain threshold, or send a message to a computer if the sensor is activated.
In summary, using a
piezoelectric sensor with an Arduino is a simple and effective way to measure
and respond to various types of mechanical energy. By following the steps
outlined above, you can create a system that can detect and respond to
pressure, acceleration, strain, and force.
// Initialize serial communication
Serial.begin(9600);
}
void loop() {
// Read the sensor value
int sensorValue = analogRead(sensorPin);
// Print the sensor value to the serial monitor
Serial.println(sensorValue);
// Wait a little bit before taking the next reading
delay(100);
}
code sets up the piezoelectric sensor on analog input pin A0 and reads the sensor value in the loop() function. The sensor value is then printed to the serial monitor using the Serial.println() function. The delay() function is used to pause the program for 100 milliseconds between readings.
With this simple example, you can see how easy it is to use a piezoelectric sensor with an Arduino. You can then use the sensor value to perform various actions based on the sensor output, such as turning on an LED or sending a message to a computer.
Application piezoelectric sensor with an Arduino
- · There are many possible applications for using a
piezoelectric sensor with an Arduino. Some examples include:
- ·
Detecting pressure: A piezoelectric sensor can be
used to detect the amount of pressure being applied to it. This could be useful
for creating a pressure-sensitive button or switch, or for measuring the
pressure of fluids or gases.
- ·
Measuring acceleration: By attaching a
piezoelectric sensor to a moving object, you can use it to measure the
acceleration of that object. This could be useful for creating an accelerometer
or for monitoring the movement of a vehicle.
- ·
Detecting strain: A piezoelectric sensor can be
used to detect the amount of strain being applied to it. This could be useful
for monitoring the stress on a structural component or for detecting vibrations
in a machine.
- ·
Measuring force: By attaching a piezoelectric
sensor to an object, you can use it to measure the amount of force being
applied to that object. This could be useful for creating a load cell or for
measuring the weight of an object.
- ·
Monitoring heart rate: A piezoelectric sensor can
be used to detect the movement of blood flow in a person's finger or earlobe,
which can be used to measure heart rate.
These are just a few examples of the many possible applications for using a piezoelectric sensor with an Arduino. By connecting a piezoelectric sensor to an Arduino and writing a program to interpret the sensor output, you can create a system that can detect and respond to various types of mechanical energy.


No comments:
if you want any help about arduino and nodemcu you contact me freely